


Smart Gear Placement From Mag Pouches to Drop Mounts
Mag pouches and other mounted gear make the difference between a battle belt that slows you down and one that works with you. Let’s break down how to position, balance, and mount your shooting gear so every reload feels natural and every movement stays smooth.
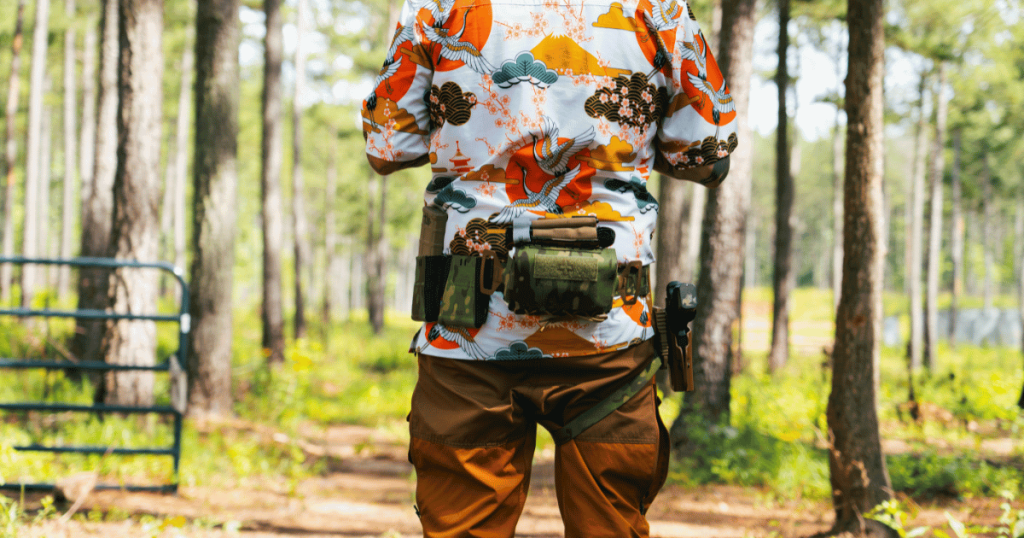
Battle Belt Ergonomics
First, let’s talk balance. A balanced belt keeps your gear accessible and prevents fatigue. Your battle belt should move with you, not against you.
Shooting Gear Placement Rules
- Keep primary equipment between the 3 and 4 o’clock positions on your dominant side. This allows fast, clean access without overreaching or twisting.
- Backup mags or secondary tools should sit around the 7–11 o’clock position or slightly behind the hip on your support side, depending on your draw preference.
- Small admin or MOLLE-compatible pouches fit well behind the hip or near your spine. These are areas where you don’t need constant access but still want reliable retention.
To fine-tune your draw angle, consider adding pouches or a holster that allows you to adjust for cant. For example, the Blue Alpha’s Angled Pistol Magazine Pouch Adapter offers 45- or 70-degree cant options for a smoother, more ergonomic reach. It’s especially useful when your pouches sit close to body armor or you need faster access from a tight stance.
Weight Distribution
Most setups naturally balance out when your pistol and holster sit on your strong side and rifle mags ride on your support side. This placement evens out the weight and keeps your belt stable during movement.
If you’re running a lighter setup or skipping the pistol entirely, you can still use modular mounts, a low-profile dump, or utility pouches to help balance things out. Even a few loaded rifle mags can pull your belt unevenly and cause hip strain. The goal is to keep the belt feeling neutral around your hips.
For more help, check out Taking Weight Off Your Battle Belt: Tips and Tricks.
Comfort Upgrades
Comfort starts with proper padding and fit.
A padded or contoured inner belt helps distribute pressure during extended wear. If you’re running a full battle belt, align pads or spacers where your hip bones sit to reduce pinch points. For heavier setups, consider adding suspenders to lift pressure off your lower back.
Vertical vs Horizontal Mag Pouches
Once you’ve settled on where things sit and how weight moves on your belt, the next decision is pouch orientation because that choice changes your hand path, access speed, and how much real estate your mag pouches take up.
Vertical pouches favor speed and a natural index for pistol mags, while horizontal pouches offer a lower profile and stack better on a belt or carrier. Choosing between them depends on your setup, movement style, and how you train to reload.
Vertical Pouches
Pros: Vertical mag pouches maximize limited belt space, allowing you to fit more magazines in a smaller footprint. Their upright design works across a wide range of setups and provides reliable retention during movement. Vertical pouches are also straightforward and familiar to most shooters.
Cons: The upright profile can add bulk to your belt or plate carrier, and tall mags may snag when seated or moving through tight spaces.
Best Use: Vertical pouches are ideal when you need secure retention and efficient use of belt real estate. Horizontal or angled pouches can be faster depending on the circumstances, but vertical designs remain the most versatile option for most loadouts. They’re a strong choice for general-purpose or mixed setups where consistency and compatibility matter more than pure speed.
Real-World Examples:
- The Blue Alpha 4-inch Pistol Mag Pouch adds extra length for extended pistol mags, like Glock 19s or 33-round sticks. It’s ideal for rigs that sit higher on the torso, offering added retention without slowing your draw.
- The Blue Alpha .308 Rifle Mag Pouch follows the same principle. It’s a vertical design built for AR10 and SR25-style magazines. The lightweight elastic body and anti-bulge construction keep it slim when empty.
Shop Vertical Pistol Mag Pouchs ↗ | Vertical Rifle Mag Pouchs ↗
Horizontal Pouches
Pros: Horizontal mag pouches have a compact footprint, sitting flatter against your belt or carrier. They’re ideal when you need to stack other tactical belt accessories or want better mobility in vehicles or prone positions.
Cons: The sideways draw can feel different at first, and some users trade a little retention for easier access.
Best Use: Use horizontal rifle mags where space and comfort matter. They’re common for competition shooters, PCC users, and low-profile duty belts.
Read Is a Horizontal Rifle Mag Pouch Right for You for a deeper dive.
Shop Horizontal Rifle Magazine Pouches ↗
Practical Rule
Match your pouch orientation to the draw you train for.
- If your muscle memory favors a straight, upward pull, stick with vertical.
- If your environment demands compact gear, a horizontal setup can make reloads smoother.
- Or try mixing both: vertical for the pistol, horizontal for the rifle, balanced across your belt for comfort and access.
Under-Mounted Accessories
Once you’ve dialed in pouch orientation and sizing, the next step is finding ways to reclaim belt space. Under-mounted gear helps you do just that by shifting select pouches or accessories below the beltline to keep your surface area clear for primary tools.
Drop Mounts
Drop mounts lower pouches to clear plate carriers or overlapping gear and free up space on your belt for primary equipment.
For example, the Blue Alpha Quick-Detach Drop Mount shifts pouches beneath your belt, freeing up surface area. Because it detaches easily, you can swap setups or remove gear between range days without unthreading your belt.
Learn more in How the Blue Alpha Quick-Detach Drop Mount Maximizes Belt Space.
Thigh Straps
When gear sits lower, movement can cause the gear to sway. A thigh strap anchors gear to your leg, keeping it steady during sprints, transitions, or kneeling. Add them for heavier gear or extended mags that hang below your beltline to improve control without restricting motion.
Practical Gear Layouts
Once you’ve balanced mounting methods and freed up space, it’s time to bring everything together into a cohesive setup. The goal is a layout that feels balanced, maintains consistent reloads, and moves comfortably with you. Use the general template below as a foundation, then tweak based on your mission, environment, or carry style.
General Battle Belt Template (Start Here)
Anchor: holster at 3 o’clock (right-handed). Reverse for this and all other positions if you shoot left-handed.
Core positions (right-handed):
- 3 o’clock: Holster (primary pistol)
- 9–11 o’clock: Primary and backup pistol mag pouches (support side).
- 8–10 o’clock (behind pistol mags): Vertical rifle mags (if used).
- 1–2 or 4–5 o’clock: Tourniquet — place where you’ll reach fastest.
- 5–7 o’clock (rear): Med pouch or larger kit.
- 6 o’clock (optional): Dump pouch.
- 11–12 o’clock / left side: Radio or comms.
- Any spare slots: Handcuffs, multitool, or admin pouch.
This layout gives you even weight distribution, quick access to essentials, and room to expand for different scenarios.
How to Tweak Your Setup
Speed / Competition:
- Keep pistol mags angled (9–11) for faster grabs.
- Move backups slightly forward (10–11) for shorter transfers.
- Minimize nonessential gear to keep the belt light and streamlined.
Patrol / Long Wear:
- Favor vertical pistol pouches to fit more mags in less space.
- Spread weight evenly: pistol on strong side, rifle mags on support side.
- Place your med kit rear (5–7) and radio left (9–11) to reduce clutter.
Concealment / Low-Profile:
- Use slim, tuckable mag pouches and belt-slide mounts.
- Keep your gear close to your body and avoid using drop mounts or thigh straps.
- Eliminate bulk at 6 o’clock to prevent printing.
Vehicle / Seated Work:
- Keep bulk off the small of your back, and shift heavy pouches forward or lateral.
- Use soft pouches around 7–8 o’clock for comfort while seated.
- Prioritize low-profile holsters and slim mags.
Chest Rig / Plate Carrier Users:
- Move primary pistol mags to the chest to free belt space.
- Use taller pouches on chest (like the Blue Alpha 4-inch Pistol Mag Pouch) for extended mags.
- Keep rifle mags and med kit on the belt for stability and balance.
Rifle-Only or No Holster Setup:
- Mirror or center rifle mags for prone and seated access.
- Add horizontal pouches where compact stacking helps.
For a deeper dive into the various belt setups, check out our other guides:
- Battle Belt Setups for Different Shooting Scenarios
- Shooting Belt Setup for Active Training and Real-World Readiness
- Competition Shooting Belt Setup for Speed and Efficiency
- A Complete Police Duty Belt Setup
Drills to Confirm Your Layout

Never trust fitment without movement drills. After each drill: tweak cant, retention, or height, and then retest.
Drill 1: Repeated Index Draw
The goal is to maintain a consistent index and a clean strip on every rep.
- From a low shooting platform or bench, draw from your primary pouch and reholster the item 10 times.
- Focus on the same smooth hand path each time.
Drill 2: Movement and Reload
This confirms the mount’s stability and reachable geometry while in motion.
- Sprint 10–15 yards, turn, and perform a reload from your primary to backup (or staged rifle mags).
- Repeat 5 times.
Drill 3: Retention Test
- Kneel, roll, or do a simulated shove while running dry draws and reloads.
- Check that bungees, flaps, and drop mounts keep mags secure and don’t bind during unconventional positions.
Build a Tactical Belt That Works With You
A smart belt setup isn’t about loading every inch of space. It’s about balance, access, and consistency. Start with your pouch orientation, fine-tune placement for comfort, and test it all until every draw feels automatic.
The more intentional your layout, the faster and more reliable your performance will be.
Build your setup with Blue Alpha. Shop mag pouches, mounts, and accessories designed for speed, comfort, and reliability.